Well, no new photos today, but a little bit of an update. I have not done a lot of work on the RR per se, but for the last month I have jumped into 3D modeling with Google Sketchup with both feet. I have produced several models and had them printed by Shapeways and it is, I must say, very cool. The coolest is my drop in Atlas O to P48 conversion bolster for their Roller Bearing trucks. It makes a several hour job into a several minute job. I got them back from Shapeways and they dropped right into, with no modifications required! I now have a set of RB's with 33" wheels for a boxcar done and one with 36" wheels done. I would have done them both, but I am saving the one on the sprue for the O scale show in Chicago, where I will be speaking about 3D modeling and the future of the hobby. Jeepers, and I've only been doing this for a month!
I hope to have more photos up soon, but I have had issues with the old computer not wanting to upload photos from my iPhone. It seems that when I updated the software, it caused issues with the phone, which, of course, should have been fixed ... I think it is a plot to get everyone to buy new iPhones!
Tuesday, March 13, 2012
Wednesday, February 1, 2012
Since I mentioned it ...
Here are some photos of the Motrak Models structure I built for the review in O Scale Trains. It will be appearing in the June issue, for those who are interested.
First off, we start with the four basic walls. I sprayed these with cheap spray paint from Wal-Mart. It's great stuff and something like $0.97 per can, or maybe $1.98, either way, its cheap and works great. These walls were assembled with canopy glue and held together while I was watching TV, in a recliner (but I wasn't reclined as I recall.

Next came the rafters, a nice feature of this original run kit, later runs will have the rafter tails.

Next the roof. I laid out 3M transfer tape on the roof to hold down the construction paper that I used for the rolled roofing. Of course, I used a little canopy glue under the edges where there is no tape to ensure that the roofing stayed down everywhere.

This is the completed structure and is one of the photos that will be appearing in the article. It was easy to build and it was a nice change of pace from what I am normally doing ... which is nothing. What with going to train shows, working and being sick since the beginning of December. Ugh ....

Wednesday, January 18, 2012
Something has happened ...
It isn't much, but it is something! I was at Mike Rose's on Monday night, doing a little ballasting and repairing of a couple track issues. To make a short story shorter, he gave me a small amount of tan colored real rock ballast. Why tan? You ask? Well, the inside of the curve at Cresco, PA has different colored ballast on it than the other, uniform gray side. I had tried making a wash an coloring the ballast on that side, but I was not satisfied with the result. So Mike's ballast did the trick and I hope I have enough to do this one section up.


When I arrived at Mike's he was screening some ballast that he had gotten from Scott Mason, who had gotten in from Ken McCory's. Well, he gave me some of the coarse stuff to try on my layout. I'm not sure about the color ... and it is a little large, but I will use it as accents in other areas ... Let me know what you think ... if you can really see it.
I suppose I should upload some photos of the structure I just completed ... hmmm

Saturday, December 3, 2011
Decrepidizing ties ....
I just made up that word, at least I think I did. Well, in the last post I had a crummy photo of the monitor that showed the abandoned track alongside the Delaware Lackawanna. Since I am trying to model the Cresco, PA area pretty faithfully, I really wanted to model a very decrepit right of way.
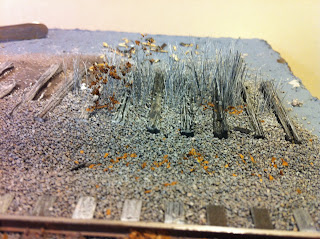
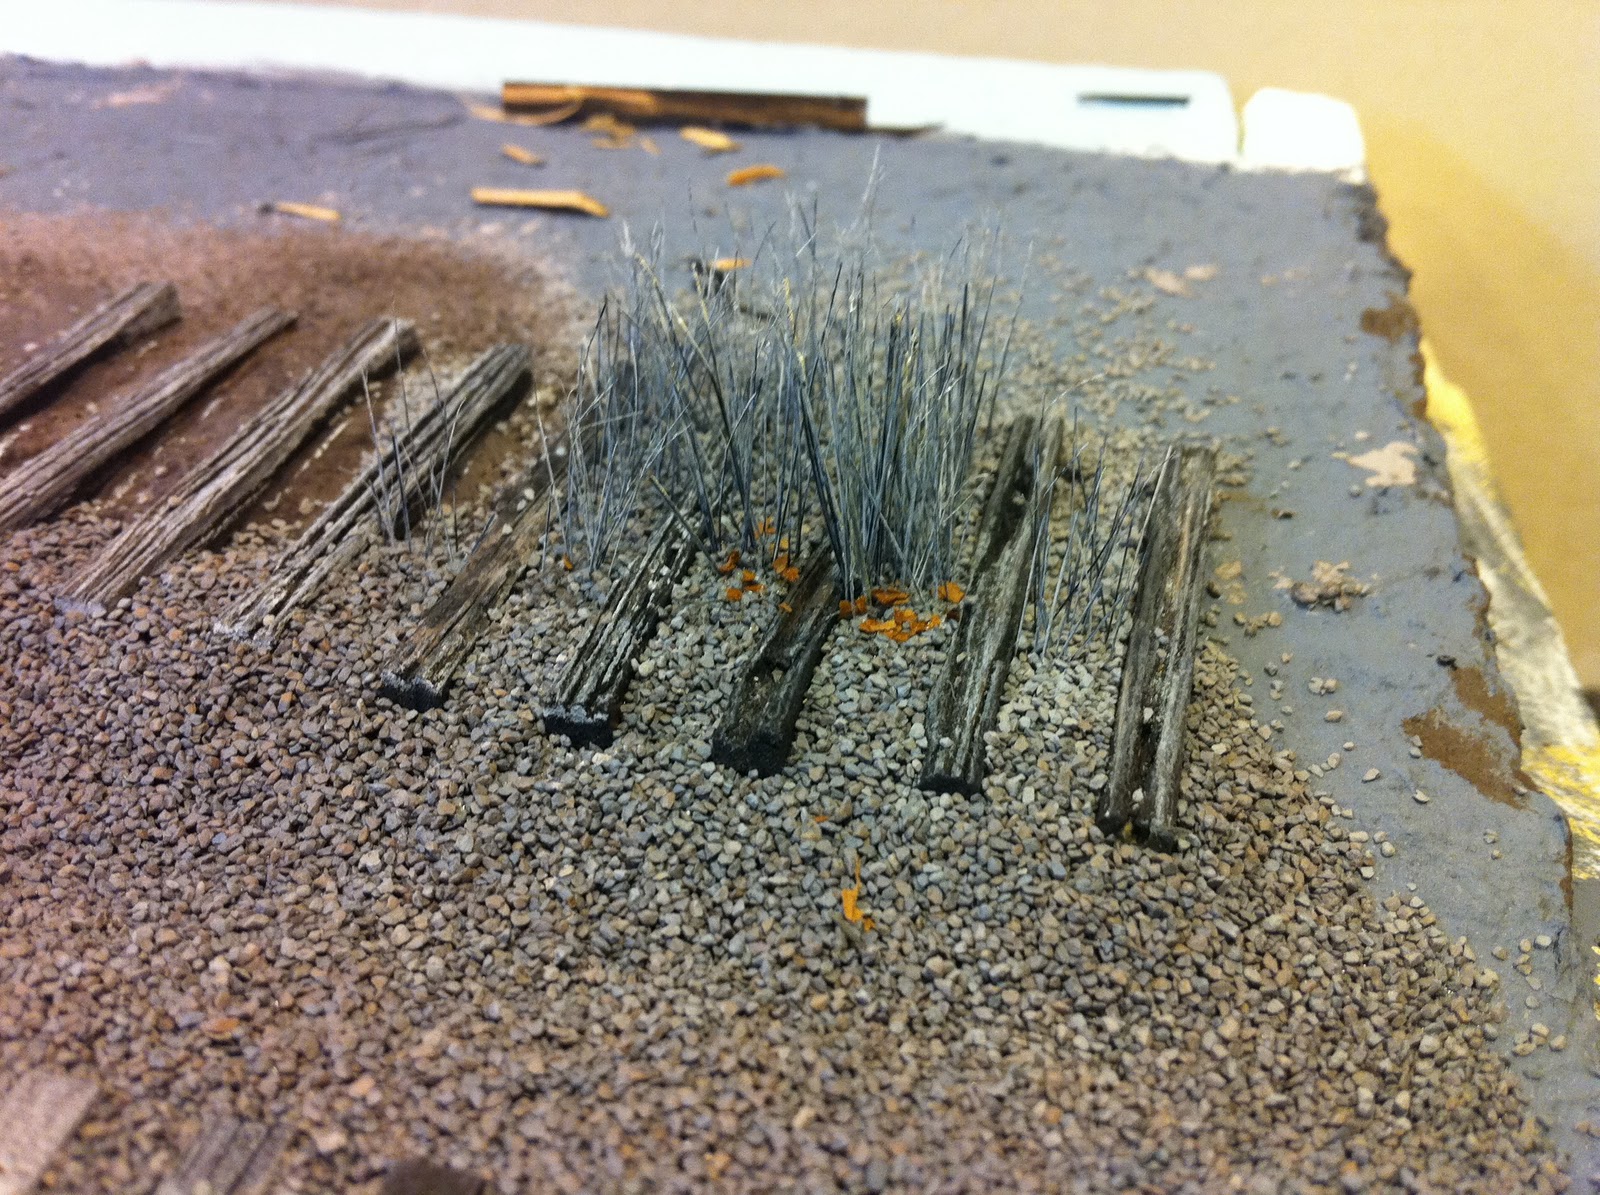
One of the first things is that rotted ties have a tendency to appear hollow, well, how would you do that? If you dig out from the top, while it might look okay, it won't look hollow. So I was able to start out doing these first five ties ...

So here are the ties after installation on the layout and application or Miniwax Ebony stain, a little bit of ballast and the addition of weeds. The weeds are paint bristles off an old paint brush that had been stained white already ...

I put the first ties down with carpenters glue, but then I remembered that I had pre-colored as per the directions on Joe Fugate's videos on scenery. That is the grey material above the unstained ties ... I did this to use as cement for the ties, but to also have them appear to be sunk into the earth ...


My process for adding the weeds is pretty slow ... I put a bottom layer of Aileen's Tacky Glue, then put in some ballast to help hold the paint bristles upright and then adhering that ballast with Future Floor Wax.

I added in a couple sprigs of Super Trees materials that I spray painted with grey spray paint and then glue some cigar leaves.


I hope you enjoy the photos and I hope to get more frequent blog updates .
One of the first things is that rotted ties have a tendency to appear hollow, well, how would you do that? If you dig out from the top, while it might look okay, it won't look hollow. So I was able to start out doing these first five ties ...

So here are the ties after installation on the layout and application or Miniwax Ebony stain, a little bit of ballast and the addition of weeds. The weeds are paint bristles off an old paint brush that had been stained white already ...

I put the first ties down with carpenters glue, but then I remembered that I had pre-colored as per the directions on Joe Fugate's videos on scenery. That is the grey material above the unstained ties ... I did this to use as cement for the ties, but to also have them appear to be sunk into the earth ...


My process for adding the weeds is pretty slow ... I put a bottom layer of Aileen's Tacky Glue, then put in some ballast to help hold the paint bristles upright and then adhering that ballast with Future Floor Wax.
I added in a couple sprigs of Super Trees materials that I spray painted with grey spray paint and then glue some cigar leaves.


I hope you enjoy the photos and I hope to get more frequent blog updates .
A needed detail ....
One of the things that I believe is sorely lacking on model railroads is that omnipresent ground cover ... leaves. They are everywhere, at least they are nowadays. Here are a couple photos illustrating my point. The first is pretty bad as it is a photo of the computer screen, but it was the best photo I had available and the second is a better one.


If you notice, leaves are everywhere, so the question is, how does one model leaves? Well, some people have tried using real leaves, the problem is that real leaves are too thick. So, I tried torn up cigar leaves ... I think that it turned out exceptionally well ...

That's the torn up leaves and the result is in the two photos below ...


The only problem is that I have to tear up a gagillion more leaves .... ugh.
Work has continued, but posts haven't ...
I am very sorry for the lack of posts, but my internet connection is sometimes a little sketchy. So, while I might have time to do a little work on the railroad (the model one), it is much harder to get posts out as you all might want.
I will start off with some posts that have gone out to the Model Rail Radio mailing list, but I have not posted here. That happens because I take the pictures with my iphone and I am able to send them to the list from that. Whereas, I am not able to send photos to the blog from my iPhone, or at least it has been sufficiently difficult that I have not pursued it.
Anyway, I have been working on the abandoned track that is going to run alongside the main line here and I have been moving along slowly, but then again, I always do ...
So this all makes sense, I am going to post bits and pieces, instead of loading it all into this one post.
Well, just so you all know, I went down to Craig Bisguier's this weekend on then Acela. It was a late afternoon train and I was able to get this photo with my iPhone as we tooled along at around 100mph.

I never cease to be impressed with the camera in the iPhone. It takes about the best model photos I have ever taken and there is no way in the world I could have gotten a picture like the above with my other cameras, at least not without a lot of prep, that was just fired out the window.
When I arrived, Craig's wife picked me up at the train station in Clifton, NJ and brought me over to his friend, Dave Ramos' house for the operating session that was on going when I arrived. It was very cool and I had a great time, even though the engineer I worked with first only killed me about 4 times ... It only hurt a little.
Today, Craig and I drove out to Scranton, PA to get research photos to help me with my Delaware Lackawanna modeling. We started out in Steamtown, where we both bought t-shirts at the store and then were greeted by CN 3254 being turned on the turntable and then backed onto a string of 6 coaches.

That photo was taken later, in Moscow, PA. After visiting the DL shops, where we saw a number of the stable outside, including 2452, and various others, as well as the rather impressive deadline, we decided to chase 3254 to Moscow, as that is in the direction of Cresco, PA, our ultimate destination. We were assured by one of the trainman that we would have no problem chasing her as she would only be going 25 mph up the hill ... Well, due to several factors, we got smoked (no pun intended) It is very difficult to believe that they were only going 25 ...

After spending some time in Cresco getting lots of photos, we were greeted by PT-98, which we chased towards the East, which just happens to be towards Craig's ... very convenient. I think this bridge needs to be modeled ... But then again, I want to model everything ...

Modeling updates are to follow ...
Friday, November 11, 2011
Believe it or not ...
Work has actually taken place.
I had gotten a tiny bit of work done since the last post in time for Craig Bisguier, Jeff Adam and Lee Weiss to come over during the lunch break from CSC11 on Saturday and take a look at my 3 feet of track and benchwork. The railroad has been taking its toll and it really does not allow me the time or energy to work on the layout. That changed this week as I have been working later in the day instead of bright and early in the AM. This appears to be kinder on the body's clock, as it were ...
I set about finishing the stretch of track, which is done, basically ... I also set up the frame for my backdrop.


To hold the styrene that I am using in place, I don't plan on using adhesive, but I made clamping blocks using 1x2 lumber that I cut a .060" slot into with a table saw.


Since I wanted to see if this was actually going to work ... I tried the unpainted styrene in place. Unfortunately, the sheet that Mike got is only 6' long not 8'. It still wouldn't have fit totally, but there would have been less splicing for me to do ...
For those of you asking: "Why use the blocks? You'll be able to see them! Really? Normally, there will be scenery hiding the bottom edge of the backdrop and the top should be hidden by any valance I put up. It also allows me to take the backdrop up and down much easier so that I don't have to reach over the module to paint it.

Since I really don't trust styrene to hold latex paint, I brought the sheet outside and primed it with a white paint spray bomb from Wal-Mart. Great paint, if you can get it.


Ideally, I think that I would like to model early/late November, possibly in the middle of a snow flurry ... tricky, but I got the idea after looking at this backdrop from Troel's Kirk ... Too bad I'm not a landscape artist like he is ...

That being the case, you all might be wondering about the next few photos, where I am going after a blue sky backdrop ... But it is the easiest to to with the amount of experience that I have, which is none ... So, I went to Lowe's to get some sky blue paint ... But I got tired of taking paint cards outside to look at the perfecgt blue sky, so I took this photo ...

And I came home with this color, as is seen after initially painting the styrene ...

So, here is the backdrop up, but not fastened in place ... I just wanted to have some color behind what I was doing ...


I think it certainly makes a big difference!
Subscribe to:
Posts (Atom)